0%

计算机是怎么显示字体的?

简化解释

计算机显示字体的过程涉及多个步骤和技术,从字符编码到图形渲染。以下是一个简化的解释:

  1. 字符编码

    • 计算机内部使用特定的编码(如ASCII、Unicode)来表示文本字符。每个字符对应一个唯一的代码点。
  2. 字体文件

    • 字体文件(如TrueType(.ttf)、OpenType(.otf))包含了字符的轮廓信息、度量信息和其他元数据。这些文件描述了每个字符的形状和大小。
  3. 字体渲染引擎

    • 字体渲染引擎(如FreeType)负责将字体文件中的字符轮廓转换为可显示的位图或矢量图形。
    • 该引擎读取字体文件,解析字符轮廓,并进行缩放、平滑处理(抗锯齿)等操作。
  4. 文字布局

    • 在将文本显示在屏幕上之前,计算机需要确定每个字符的确切位置。这涉及处理字距调整(Kerning)、行距调整和复杂脚本的布局(如阿拉伯文、印地语等)。
    • 一些高级布局引擎(如HarfBuzz)会处理这些复杂的布局任务。
  5. 光栅化

    • 光栅化是将矢量图形转换为像素位图的过程。字体渲染引擎通过扫描转换技术将字符的矢量轮廓转换为像素阵列。
  6. 显示

    • 最终,计算机将生成的位图或者矢量图形发送到显示设备(如屏幕)。图形系统(如Windows的GDI、macOS的Quartz、Linux的X Window System)会处理最终的显示工作。

详细步骤示例

  1. 字符输入

    • 用户输入字符,比如”A”。
    • 该字符被转换为对应的编码(如Unicode编码U+0041)。
  2. 选择字体

    • 系统根据用户设置或应用程序默认设置选择一个字体文件(如Arial.ttf)。
  3. 读取字符轮廓

    • 字体渲染引擎(如FreeType)读取Arial.ttf文件中的数据,找到字符”A”的轮廓信息。
  4. 缩放和平滑处理

    • 字体渲染引擎根据当前的显示分辨率和大小设置,对字符轮廓进行缩放和平滑处理,以避免锯齿边缘。
  5. 光栅化

    • 字符轮廓被转换为位图,这意味着”A”的形状被转换成一系列黑白像素。
  6. 显示输出

    • 位图被送到图形系统,图形系统将其绘制到屏幕上的指定位置,用户最终看到显示在屏幕上的字符”A”。

什么是轮廓信息?

字符轮廓(Character Outline)是指用于描述字体中每个字符形状的矢量数据。与位图字体不同,矢量字体使用数学曲线和直线来定义字符的形状,因此可以在不同尺寸和分辨率下进行无损缩放。字符轮廓通常由一系列控制点和曲线(如贝塞尔曲线)组成。

字符轮廓的组成

  1. 控制点(Control Points)

    • 控制点是定义曲线和直线的关键点。它们决定了字符轮廓的形状。
  2. 线段和曲线

    • 线段:由两个控制点之间的直线段组成。
    • 曲线:通常由贝塞尔曲线或其他曲线形式定义,贝塞尔曲线是通过起点、终点和一个或多个控制点来定义的。

字符轮廓的生成过程

  1. 设计

    • 字体设计师使用字体设计软件(如Adobe Illustrator、FontLab、Glyphs)绘制字符的轮廓。设计师使用控制点和曲线来创建每个字符的形状。
  2. 存储

    • 设计好的字符轮廓被存储在字体文件中(如TrueType或OpenType文件)。这些文件包含了字符的轮廓信息、度量信息(如字符的高度、宽度、间距等)以及其他元数据。
  3. 渲染

    • 当需要在屏幕上显示字符时,字体渲染引擎会读取字体文件中的轮廓信息,并根据显示设备的分辨率和字体大小进行缩放和光栅化处理。

光栅化过程

光栅化是将字符轮廓转换为像素图像的过程。它通常包括以下步骤:

  1. 缩放

    • 根据显示尺寸和分辨率,将字符轮廓按比例缩放。
  2. 扫描转换

    • 将矢量轮廓转换为栅格位图。扫描转换是通过将轮廓填充为像素网格来完成的。
  3. 抗锯齿

    • 应用抗锯齿技术,以平滑字符边缘,减少锯齿效应,使字符看起来更清晰和光滑。

优点

使用字符轮廓有以下优点:

  1. 可缩放性

    • 由于字符轮廓是矢量数据,可以在任何尺寸和分辨率下无损缩放。
  2. 清晰度

    • 通过抗锯齿技术,可以使字符边缘更加平滑,提升文本的可读性。
  3. 灵活性

    • 矢量字体可以轻松地进行变形、旋转和其他操作,适用于各种排版需求。

例子

以下是一个简单的字母”A”的字符轮廓示例:

  • 字母”A”的轮廓可能由三部分组成:两个斜边和一个横杠。
  • 斜边和横杠可以通过控制点和贝塞尔曲线来定义。
1
2
3
4
A
/\
/ \
|--|

在字体文件中,字母”A”的轮廓信息可能被存储为:

  • 斜边:从控制点(0,0)到(50,100)和(50,100)到(100,0)
  • 横杠:从控制点(25,50)到(75,50)

这些控制点和线段定义了字母”A”的形状,字体渲染引擎会根据这些数据生成实际的位图图像,以供显示。

实践

ok,理论大概讲完了,那么我们能不能实践一下呢?我想用python读取字体文件的信息;并用很简单的,很入门的图形库trutle(第一次知道这个库是在大学里的第一堂python课上,怀念~),去抽象出画笔。

1
2
3
4
5
6
7
8
9
10
11
12
13
14
15
16
17
18
19
20
21
22
23
24
25
26
27
28
29
30
31
32
33
34
35
36
37
38
39
40
41
42
43
44
45
46
47
48
49
50
51
52
53
54
55
56
57
58
59
60
61
62
63
64
65
66
67
68
69
70
71
72
73
74
75
76
77
78
import turtle
from fontTools.ttLib import TTFont
from fontTools.pens.basePen import BasePen

class SimplePen(BasePen):
def __init__(self, glyphSet):
super().__init__(glyphSet)
self.path = []

def _moveTo(self, p0):
self.path.append(('moveTo', p0))

def _lineTo(self, p1):
self.path.append(('lineTo', p1))

def _curveToOne(self, p1, p2, p3):
self.path.append(('curveTo', (p1, p2, p3)))

def _closePath(self):
self.path.append(('closePath',))

def get_glyph_outline(font_path, unicode_char):
# 打开字体文件
font = TTFont(font_path)

# 获取字形集
glyphSet = font.getGlyphSet()

# 获取字符的字形ID
cmap = font.getBestCmap()
glyph_id = cmap[ord(unicode_char)]

# 获取指定字形
glyph = glyphSet[glyph_id]

# 使用SimplePen提取轮廓信息
pen = SimplePen(glyphSet)
glyph.draw(pen)

return pen.path

def draw_outline_with_turtle(outline, scale=1.0, offset=(0, 0)):
# 初始化turtle
turtle.speed(1)
turtle.penup()

for command in outline:
if command[0] == 'moveTo':
x, y = command[1]
turtle.goto(scale * x + offset[0], scale * y + offset[1])
turtle.pendown()
elif command[0] == 'lineTo':
x, y = command[1]
turtle.goto(scale * x + offset[0], scale * y + offset[1])
elif command[0] == 'curveTo':
# 贝塞尔曲线的绘制需要进一步处理,这里我们只绘制直线近似
# 获取曲线的终点
_, _, end_point = command[1]
x, y = end_point
turtle.goto(scale * x + offset[0], scale * y + offset[1])
elif command[0] == 'closePath':
turtle.penup()

turtle.done()

# 示例:读取SimSun字体中的汉字“好”的轮廓信息
font_path = 'Noto_Sans_SC/NotoSansSC-VariableFont_wght.ttf' # 替换为你的字体文件路径
unicode_char = '张'

outline = get_glyph_outline(font_path, unicode_char)

# 调整绘图比例和起点位置,使其在屏幕中心显示
scale = 0.1
offset = (-200, 0) # 根据需要调整偏移量以将字符放置在适当位置

# 使用turtle绘制轮廓
draw_outline_with_turtle(outline, scale=scale, offset=offset)

效果展示:
alt text

性能测试的重要性

因为最近用到的性能测试工具比较多,例如fio, wrk。所以难免有一些感慨。
计算机是一个严格的科学工具,里边没有黑魔法,里边所有的东西都是可以测量的。什么是科学?科学具有可证伪性,可检验性。有个有趣的段子:

1
2
你要是推翻西医里的理论,那是可以拿诺奖的。
你要是推翻中医里的理论。那后果...

回忆之前在课本里学到了很多概念,例如时间复杂度分析,学的时候觉得很枯燥,彷佛用不上。平时自己写的小程序,在自己的个人电脑上也都是瞬间执行结束的。根本体会不到时间复杂度的重要性。直到我在leetcode上遇到1G的数据量时,我才真正的体会到了时间复杂度的重要。

1
2
3
4
>>> log(10**9,2)
29.897352853986263
>>> 10**9 / log(10**9,2)
33447777.29599791

不知道,你有没有对这个计算结果吃惊呢?
有的时候我就在想:是计算机太快了,绝大多数普通人是感受不到毫秒级的延迟的。当然更重要的是好多人也不会遇到这样的问题,毕竟能有百万并发的场景是少数大厂。既然遇不到这样的问题,那么所有的知识,就会变得枯燥。
Latency Numbers Every Programmer Should Know

anyway所有的东西都是可以测试的,可以通过数学去计算,度量的。去分析瓶颈在哪里,看Htop, 火焰图iostat,最后分析讨论该怎么优化。
记得用成熟的工具去测试,否则盲目的人肉测试是不科学的。

Http性能测试

无意中发现了一个非常simple的http-server, 还是那句话,http的本质是确定格式的文本读写。

1
wrk -t12 -c400 -d30s http://127.0.0.1:7890

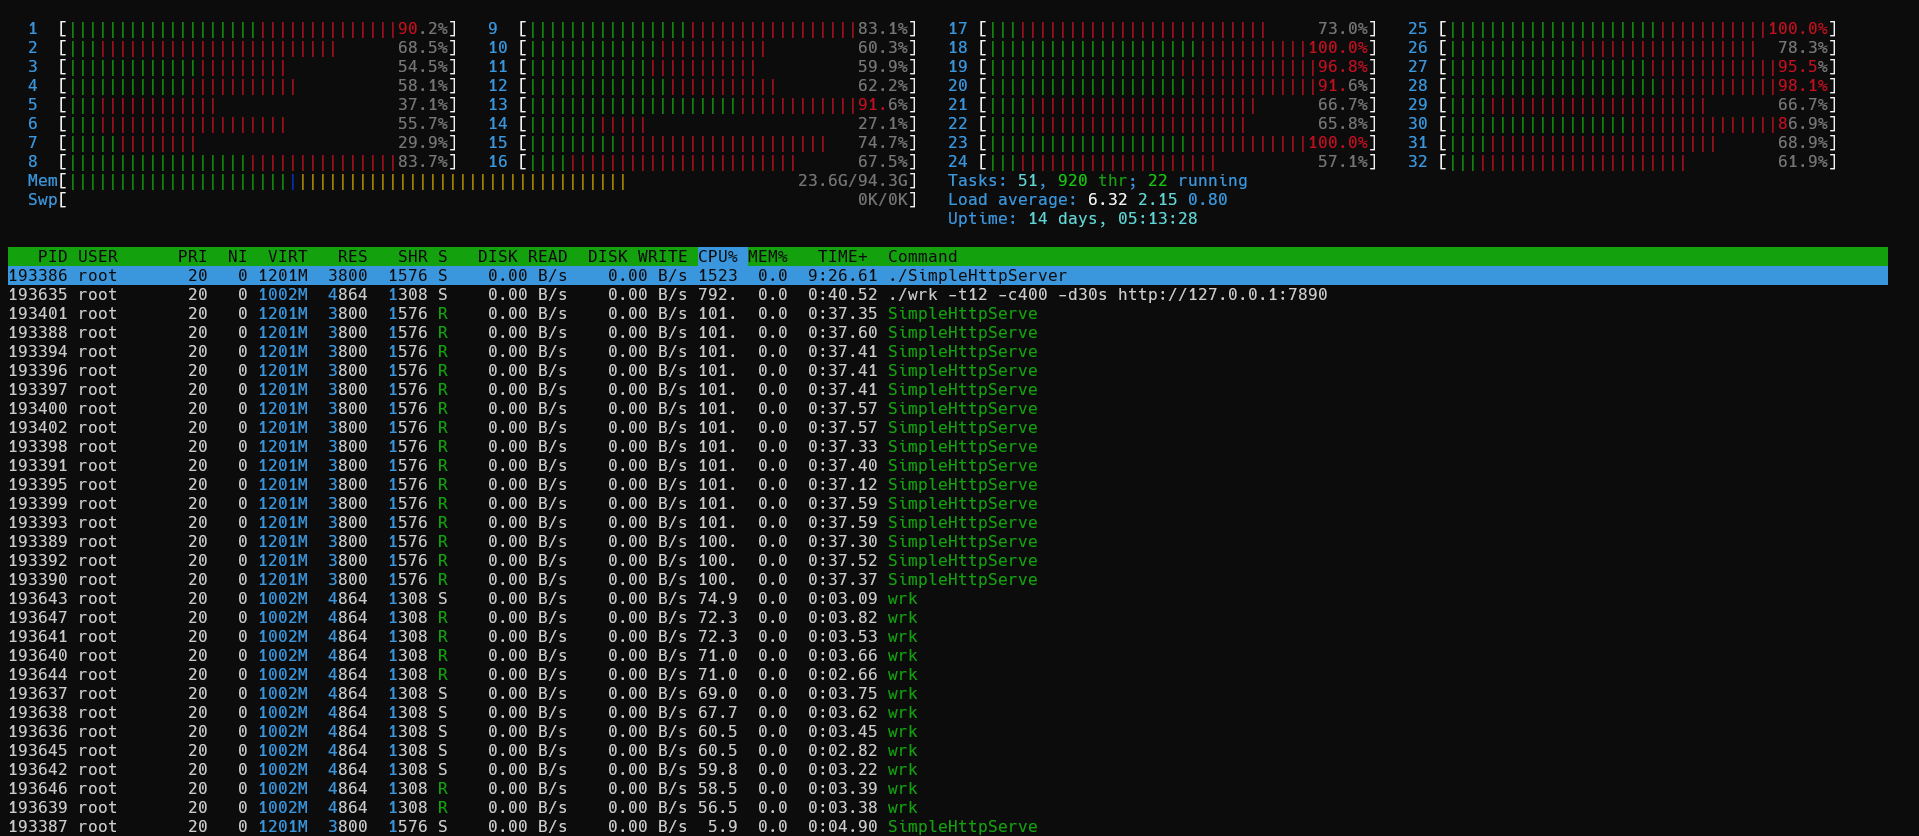
结果

1
2
3
4
5
6
7
8
Running 30s test @ http://127.0.0.1:7890
12 threads and 400 connections
Thread Stats Avg Stdev Max +/- Stdev
Latency 800.64us 3.95ms 202.80ms 99.83%
Req/Sec 47.56k 5.41k 98.40k 89.10%
17068381 requests in 30.10s, 1.24GB read
Requests/sec: 567065.38
Transfer/sec: 42.18MB

Htop

对比一下之前的常用的Flask

1
2
3
4
5
6
7
(venv) [root@node1 demo-flask]# python demo.py
* Serving Flask app 'demo' (lazy loading)
* Environment: production
WARNING: This is a development server. Do not use it in a production deployment.
Use a production WSGI server instead.
* Debug mode: off
* Running on http://127.0.0.1:5000/ (Press CTRL+C to quit
1
2
3
4
5
6
7
8
9
10
[root@node1 wrk]# ./wrk -t12 -c400 -d30s http://127.0.0.1:5000
Running 30s test @ http://127.0.0.1:5000
12 threads and 400 connections
Thread Stats Avg Stdev Max +/- Stdev
Latency 284.32ms 178.98ms 1.96s 81.05%
Req/Sec 71.11 42.46 292.00 73.87%
24828 requests in 30.03s, 3.93MB read
Socket errors: connect 0, read 0, write 0, timeout 131
Requests/sec: 826.80
Transfer/sec: 134.03KB

加上WSGI

  • 四进程
    1
    2
    3
    4
    5
    6
    7
    8
    (venv) [root@node1 demo-flask]# gunicorn -w 4 -k gevent demo:app -b :7889
    [2024-03-13 08:49:25 +0000] [220624] [INFO] Starting gunicorn 21.2.0
    [2024-03-13 08:49:25 +0000] [220624] [INFO] Listening at: http://0.0.0.0:7889 (220624)
    [2024-03-13 08:49:25 +0000] [220624] [INFO] Using worker: gevent
    [2024-03-13 08:49:25 +0000] [220627] [INFO] Booting worker with pid: 220627
    [2024-03-13 08:49:25 +0000] [220628] [INFO] Booting worker with pid: 220628
    [2024-03-13 08:49:25 +0000] [220629] [INFO] Booting worker with pid: 220629
    [2024-03-13 08:49:26 +0000] [220630] [INFO] Booting worker with pid: 220630
    1
    2
    3
    4
    5
    6
    7
    8
    9
    10
    [root@node1 wrk]# ./wrk -t12 -c400 -d30s http://127.0.0.1:7889
    Running 30s test @ http://127.0.0.1:7889
    12 threads and 400 connections
    Thread Stats Avg Stdev Max +/- Stdev
    Latency 24.68ms 147.52ms 2.00s 96.66%
    Req/Sec 3.44k 3.16k 11.86k 53.42%
    353945 requests in 30.04s, 57.72MB read
    Socket errors: connect 0, read 0, write 0, timeout 502
    Requests/sec: 11782.63
    Transfer/sec: 1.92MB
  • 八进程
    1
    2
    3
    4
    5
    6
    7
    8
    9
    10
    [root@node1 wrk]# ./wrk -t12 -c400 -d30s http://127.0.0.1:7889
    Running 30s test @ http://127.0.0.1:7889
    12 threads and 400 connections
    Thread Stats Avg Stdev Max +/- Stdev
    Latency 13.29ms 107.98ms 2.00s 98.02%
    Req/Sec 4.49k 2.79k 17.94k 71.28%
    709308 requests in 30.04s, 115.67MB read
    Socket errors: connect 0, read 11, write 0, timeout 445
    Requests/sec: 23612.98
    Transfer/sec: 3.85MB
  • 十六进程
    1
    2
    3
    4
    5
    6
    7
    8
    9
    10
    [root@node1 wrk]# ./wrk -t12 -c400 -d30s http://127.0.0.1:7889
    Running 30s test @ http://127.0.0.1:7889
    12 threads and 400 connections
    Thread Stats Avg Stdev Max +/- Stdev
    Latency 86.79ms 283.99ms 2.00s 91.56%
    Req/Sec 4.73k 3.01k 28.13k 67.26%
    1318602 requests in 30.10s, 215.04MB read
    Socket errors: connect 0, read 0, write 0, timeout 1732
    Requests/sec: 43807.48
    Transfer/sec: 7.14MB
    总结

一:提交代码流程

  1. 同步最新代码
    1
    2
    git fetch
    git merge --ff-only
  2. 创建新分支 version_{bug-id}
    1
    git checkout -b 8.2-PBT-1234
  3. 修改代码…
  4. 添加
  5. 提交
    1
    git commit
  6. 推送远程仓库
    1
    git push origin 8.2-PBT-1234
  7. code review
  8. 删除分支
    1
    git branch -D 8.2-PBT-1234
  9. 同步其他分支子模块更新后,主模块需要更新添加子模块
    1
    git add iso-sources/kylin-v10

二: 特殊处理

模块管理

1
2
vim .gitmodules  # view git modules
git submodule update --init bt-ganesha/src/nfs-ganesha # 拉取子模块的代码

修改commit日志

1
git commit --amend

强推

1
git push origin 8.2-PBT-5703 --force

合并提交

1
git rebase -i HEAD~2 # 记得选s.

提交后测试不通过

1
git rebase origin/virtualstor-8.3

cherry-pick

1
2
git cherry-pick <commitHash>
git cherry-pick <branch>

同步主分支

1
2
3
git fetch
git rebase origin/scaler/8.3/12.2.13/master
git push origin PBT-5804 --force

回退到指定位置

1
git reset --hard hash

主项目合并子项目

1
2
3
4
5
6
7
8
9
10
11
12
13
cd ./主项目路径
git fetch
git merge --ff-only
git submodule update # 非常重要
cd ./子项目路径
git checkout 子项目的分支
git fetch
git merge --ff-only
git add 子项目
git commit # [子项目名] message, for example: [ezs3-ceph] add s3 tier related
commit
git checkout -b 8.2-s3-tier-fix-v3
git push origin 8.2-s3-tier-fix-v3

三:理解Git

在计算机的世界里,考虑问题一般有两种思路。一种是自顶向下,一种是自下向上。个人观点:如果是做应用,那么自顶向下的思路非常好,如果是做研究,那么自下向上的思路会更好。今天我们从更底层的角度去考虑Git。

Git’s data model

1
2
3
4
5
6
7
8
9
10
11
12
13
// a file is a bunch of bytes
type blob = array<byte>

// a directory contains named files and directories
type tree = map<string, tree | blob>

// a commit has parents, metadata, and the top-level tree
type commit = struct {
parents: array<commit>
author: string
message: string
snapshot: tree
}

Objects and content-addressing

1
2
3
4
5
6
7
8
9
10
type object = blob | tree | commit

objects = map<string, object>

def store(object):
id = sha1(object)
objects[id] = object

def load(id):
return objects[id]

例子

我们可以使用git cat-file -p <hash>去理解:Git’s data model and Objects and content-addressing

1
2
3
4
5
6
7
8
9
10
11
12
13
14
15
16
17
18
19
20
21
22
23
24
25
26
27
$git cat-file -p 6dcc7249a05b18591354926bfa7259b9f03baa7f
tree 19421a887b2ce8cdd1e18e79ccd970da223a738a
parent c28082e80d7262f20f61aa5d17df71451ff26cb4
author demo-zhang <demo-zhang@qq.com> 1706843273 +0800
committer demo-zhang <demo-zhang@qq.com> 1709125816 +0800
[update] 修改~

[笔记] 性能测试
$git cat-file -p 19421a887b2ce8cdd1e18e79ccd970da223a738a
040000 tree 22b768bcfa6ace79bc888dffca09bad950b74929 .github
100644 blob c8677bde9b5b228af47f4451bbf2f621239065bd .gitignore
100644 blob 49f46de3ebf96c3d189f7e7f3dd469477c3ea36e .gitmodules
100644 blob e69de29bb2d1d6434b8b29ae775ad8c2e48c5391 _config.landscape.yml
100644 blob 86ac462512e3128e001ad2a0dcfcde2b8e5b1ecb _config.yml
100644 blob e290158a9fd84184e0bbb4f9942a6aa2116fdb7d package-lock.json
100644 blob 79d10fdaa92d541429bf3f8d9f0084612a3a0f4c package.json
040000 tree fadf7ab7818d6053c708c5133a560cb3b4759281 scaffolds
040000 tree d212beb8a5145b3c52b0d55770947b1e1072f8d2 source
040000 tree 0ef98a955dee3dc7da1ef212a39fe91443dd7622 themes

$git cat-file -p d212beb8a5145b3c52b0d55770947b1e1072f8d2
040000 tree 8fcd384c88c75735dc52d942b8455a1ac83e7f0a _posts
040000 tree 0f6f9b7f175ff6374ccebdb9743f641012a20f20 images

$git cat-file -p 8fcd384c88c75735dc52d942b8455a1ac83e7f0a
...

优雅切割

  • 默认空格
    1
    2
    3
    4
    5
    6
    7
    8
    9
    10
    11
    12
    13
    14
    #include <string>
    #include <sstream>
    #include <iostream>

    using namespace std;

    int main() {
    istringstream iss("capiTalIze tHe titLe");
    string s;
    while (iss >> s) {
    std::cout << "size = "<< s.size() << " " << s << std::endl;
    }
    return 0;
    }
  • 指定字符
    1
    2
    3
    4
    5
    6
    7
    8
    9
    10
    11
    12
    13
    14
    #include <string>
    #include <sstream>
    #include <iostream>

    using namespace std;

    int main() {
    istringstream iss("capiTalIze, tHe, titLe");
    string s;
    while (getline(iss, s, ',')) {
    std::cout << "size = "<< s.size() << " " << s << std::endl;
    }
    return 0;
    }
  • 优雅format
    1
    2
    3
    4
    5
    6
    7
    8
    9
    10
    11
    12
    13
    #include <string>
    #include <sstream>
    #include <iostream>

    using namespace std;

    int main() {
    istringstream iss("1 2 3");
    int i, j, k;
    iss >> i >> j >> k;
    cout << "i=" << i << ", j=" << j << ", k=" << k << endl;
    return 0;
    }

下载代码

code。关于版本,我这里参考的是cppreference, 例如:通过阅读文档,可以知道:完全支持cpp17, 至少需要 gcc-7.0

1
2
3
wget https://ftp.gnu.org/gnu/gcc/gcc-13.2.0/gcc-13.2.0.tar.gz
tar -xzf gcc-13.2.0.tar.gz
cd gcc-13.2.0

编译和安装

1
2
3
4
5
mkdir build
cd build
../configure --prefix=/usr/local/gcc-13.2.0/build --enable-languages=c,c++ --disable-multilib
make
make install
  • --prefix=[PATH]: 这个参数非常重要,确定了gcc的安装路径。就是执行make install后,gcc的安装路径。
  • 当执行完make install后,才会生成完整的gcc。

使用

  • 配置环境变量
    1
    2
    export CC=/usr/local/gcc-13.2.0/build/bin/gcc
    export CXX=/usr/local/gcc-13.2.0/build/bin/g++
  • 写入CMake
    1
    2
    set(CMAKE_C_COMPILER /usr/local/gcc-13.2.0/build/bin/gcc)
    set(CMAKE_CXX_COMPILER /usr/local/gcc-13.2.0/build/bin/g++)
    参考how-to-specify-new-gcc-path-for-cmake

命令

1
2
3
4
perf record -F 99 -p [pid] -g -- sleep 60
perf script > out.perf
./stackcollapse-perf.pl out.perf > out.folded
./flamegraph.pl out.folded > out.svg

命令的解释:

  • perf record: 启动perf的记录模式,用于收集性能数据。

  • -F 99: 设置记录事件的采样频率。在这里,设置为99,表示每秒进行99次采样。采样频率的选择依赖于需要捕获的性能信息以及对性能开销的容忍度。

  • -p 13204: 指定要监视的进程的PID(进程ID)。在这个例子中,监视的是PID为13204的进程。

  • -g: 启用调用图跟踪,收集函数调用堆栈信息。这对于分析程序的性能瓶颈和理解函数之间的调用关系非常有用。

  • --: 表示后面的参数是要执行的命令。在这里,是sleep 30,即使perf工具在后台运行,记录了30秒的性能数据。

  • perf script > out.perf: 将收集到的数据转换为可读的文本格式。

  • ./stackcollapse-perf.pl out.perf > out.folded: 生成stack。

  • ./flamegraph.pl out.folded > out.svg: 生成火焰图

perf 做了什么事

可以简单的理解perf是一个采样工具,对CPU正在执行的函数,以及当前的函数堆栈(stack), 进行采样。
perf是怎么做这件事的呢? 我猜测是通过读取/proc/[pid]下的内容,进行统计,监控。

FlameGraph是解释型语言Perl写的。所以无需安装,只需要下载源代码,就可以执行。

参考

其实写这篇博客的时候,已经是2024年啦~
今年有无数次想写博客的冲动,但是因为拖延症,所以没有写。

今年对我来说是:时间过得飞快的一年。或许六月份是一个节点,六月份之前是一种生活,六月份之后又是一种生活。六月份之前,稳定的部门聚餐,团建。四月份的时候还去了重庆。重庆是一个非常繁华,非常热闹的城市。我也玩得很开心~ 自己一个人去了酒吧,看到了很多光鲜亮丽的小姐姐,一对对的情侣,还有几个听到《晴天》就被唱哭的路人朋友。不得不感慨,原来酒吧里有这么多真实的,单纯的人啊。
十八梯~ 十八水~ 十点半的飞机,它不下来~

Bigtera是一个非常强的技术团队,我也很荣幸能够加入这样的团队,自己能够做一点微薄贡献。从前端的vue,到后端的flask,这些开发任务都可以熟练地完成。当然最核心的ceph,我也侥幸做过一点贡献。

六月份之后,就是一种新的生活了。这个六个月的时间过得就像一天一样。

最大的成就就是只狼一周目通关了。战胜了一个个的boss,蝴蝶夫人,狮子猿,破解僧… 非常享受完美弹刀时,释放多巴胺的感觉。
英语的进步也很大,继续加油叭~

今年感悟最多地句子是:命运里的一切馈赠,早已在暗中标好了价格~

“缺爱”这个词是我经常用到的。最近几天发现我周围的朋友似乎也会提到这个词。讲 :”我们来这里,不就是为了找爱吗?”; 讲 :”我做爱不缺人,只是缺爱而已”。

那什么是爱呢?在思考这个问题的时候,我的脑海中浮现出了今年在超市遇到的一幕。在一大排摆满成人用品的货架前,一个帅哥开心地大声喊:”哇~宝贝,你看这里有好多好东西啊~“,然后一个美女缓缓走来,一脸娇羞和宠溺的语气说:”那你买嘛,那你买嘛~“。
虽然这一幕已经过去好久,但是我依然记得。我总是感觉这个帅哥的落落大方,真诚,真实,像小孩子一样的开心;美女的娇羞,宠溺; 都是现在这个社会难能可贵的。

因为现在社会的主流意识是偏压抑的,偏保守的。压抑,保守的原因,可能是生产力的束缚,如果一个人生产力不足,那他必然会选择压抑的,保守的态度处理问题。他需要得到主流意识的认可。选择压抑,保守的态度,至少可以保持自己现有的积累。

所以国内有梁山伯与祝英台,国外有罗密欧与朱丽叶,似乎道理都是一样。所以说”爱“是很难的。我缺的爱是更难的,我非常渴望构建一个更好的原生家庭,我们彼此之间自由,开放,把彼此放在最重要的位置。是开心,是宠溺。我们的精力用在让生活更精彩,更有意义,更有成长。

当然这些都很难。但是你也不要放弃,因为目前你的生活和积累,并不是很差。还有选择的机会。

王小波在黄金时代这样描述”那一天我二十一岁,在我一生的黄金时代。我有好多奢望。我想爱,想吃,还想在一瞬间变成天上半明半暗的云。后来我才知道,生活就是个缓慢受锤的过程,人一天天老下去,奢望也一天天消失,最后变得像挨了锤的牛一样。可是我过二十一岁生日时没有预见到这一点。我觉得自己会永远生猛下去,什么也锤不了我。“

加油叭~

下载源码

1
git clone https://github.com/facebook/rocksdb.git

编译 & 安装

1
2
make
make install

测试

1
2
3
4
5
6
7
8
9
10
11
12
13
14
15
16
17
18
19
20
21
22
#include <assert.h>
#include "rocksdb/db.h"

#include <string>
#include <iostream>

int main() {
rocksdb::DB* db;
rocksdb::Options options;
options.create_if_missing = true;
rocksdb::Status status =
rocksdb::DB::Open(options, "./db_dir", &db);

status = db->Put(rocksdb::WriteOptions(), "hello", "world"); //写
if (status.ok()) {
std::string k("hello");
std::string v;
db->Get(rocksdb::ReadOptions(), k, &v); //读
std::cout << v << std::endl;
}
assert(status.ok());
}

编译 & 链接

尝试:

1
g++ test.cc

报错:

1
2
3
4
/usr/local/include/rocksdb/wide_columns.h:51:21: error: ‘make_from_tuple’ is not a member of ‘std’; did you mean ‘make_tuple’?
51 | value_(std::make_from_tuple<Slice>(std::forward<VTuple>(value_tuple))) {
| ^~~~~~~~~~~~~~~
| make_tuple

解决方法:

1
g++ test.cc -std=c++17

报错:

1
undefined reference to `rocksdb::DB::Open(rocksdb::Options const&, std::__cxx11::basic_string<char, std::char_traits<char>, std::allocator<char> > const&, rocksdb::DB**)'

解决方法:

1
g++ test.cc -std=c++17 -lrocksdb

报错:

1
undefined reference to `pthread_mutex_trylock'

解决方法:

1
g++ test.cc -std=c++17 -lrocksdb -lpthread

报错:

1
undefined reference to `dlopen'

解决方法:

1
g++ test.cc -std=c++17 -lrocksdb -lpthread -ldl

ok, 成功啦。啰啰嗦嗦地写了这么多,是为了加强自己对编译链接的理解。

遍历rocksdb

1
2
3
4
5
6
7
8
9
10
11
12
13
14
15
16
17
18
19
20
21
22
23
24
25
26
#include <cassert>
#include <rocksdb/db.h>
#include <iostream>
using namespace std;
int main(int argc, char** argv) {
rocksdb::DB* db; rocksdb::Options options;
options.create_if_missing = true; //打开数据库
rocksdb::Status status = rocksdb::DB::Open(options, "./omap", &db);
assert(status.ok()); //插入数据
// db->Put(rocksdb::WriteOptions(), "key1", "value1");
// db->Put(rocksdb::WriteOptions(), "key2", "value2");
// db->Put(rocksdb::WriteOptions(), "key3", "value3");
// db->Put(rocksdb::WriteOptions(), "key4", "value4");
// db->Put(rocksdb::WriteOptions(), "key5", "value5");
rocksdb::Iterator* it = db->NewIterator(rocksdb::ReadOptions()); //使用迭代器获取所有key和value
for (it->SeekToFirst(); it->Valid(); it->Next()) {
cout << "key is: " << it->key().ToString() << endl;
cout << "value is: " << hex << it->value().ToString() << endl;
cout << "++++++++++++++++++++" << endl;
}
assert(it->status().ok());
delete it; //关闭数据库
status= db->Close();
delete db;
}

背景

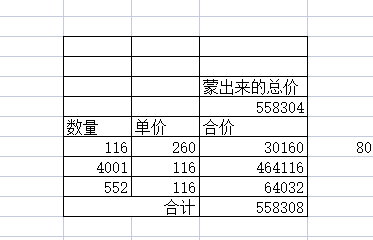
前几星期的晚上,有位朋友打电话问我一个问题。给定一个总价,和若干物品的单价。求出每个物品采购的数量,使得采购总和刚好等于给定的总价。
例如这样:

他说:“他算了很久,都没有合适的结果。”我说:“电话不要挂断,我很快就帮你算出来。” 于是乎,我打开pycharm,几行python代码就算出来了合适的结果。(很快啊)

他说:“计算机太牛了,比人的效率高太多了。这样的问题,我经常在工地上遇到,以后遇到了还找你算。”

开发需求

既然是经常遇到问题,那是不是应该开发一个合适的用户程序,让用户更加方便地使用起来呢。我总不能把我的代码直接丢给人家,让人家直接运行啊。代码的运行需要一个开发环境,总不能让人家配置一套python或者c++什么的开发环境吧。所以我们需要开发一个简单的GUI程序。
总结一下当前比较火的GUI开发方向。移动端(主要设备是手机),浏览器,PC桌面,小程序。其实我对浏览器的网页开发一直是非常感兴趣的,因为跨平台,有vue,react等开发框架。但是浏览器需要service,所以我放弃啦。ok那就移动端吧,但是我这位兄弟用的是苹果手机,我用的是小米手机。而且我也没有苹果电脑。所以我放弃啦。那就只能PC桌面啦,而且他身边也有电脑。

开发

其实GUI开发一直是我弱项,整天把自己的学习精力放在探索计算机里没有黑魔法的事情上了。但是也不影响,看看文档就可以快速上手了。
简单画了一个布局,添加几个组件。几个小时就可以搞定。
为了支持可以动态添加物品,所以还需要一个递归的算法。自从看了SICP,对递归的理解更深了。递归代码也可以轻松拿捏。写之后才发现这个问题和著名的背包问题非常类似。所以算法是很重要,很核心的。

打包命令

1
pyinstaller -F main.py

测试


ok,能用。

代码

1
2
3
4
5
6
7
8
9
10
11
12
13
14
15
16
17
18
19
20
21
22
23
24
25
26
27
28
29
30
31
32
33
34
35
36
37
38
39
40
41
42
43
44
45
46
47
48
49
50
51
52
53
54
55
56
57
58
59
60
61
62
63
64
65
66
67
68
69
70
71
72
73
74
75
76
77
78
79
80
81
82
83
84
85
86
87
88
89
90
91
92
93
94
95
96
97
98
99
100
101
102
103
104
105
106
from PyQt6.QtCore import Qt
from PyQt6.QtWidgets import (QWidget, QPushButton, QLineEdit,
QInputDialog, QApplication, QLabel, QDialog, QDialogButtonBox, QVBoxLayout)
import sys
import time

f_ret = []
def f(total, price, ix, args = []):
p = price[ix - 1]
if ix == len(price):
if total % p == 0:
f_ret.append(args + [total // p])
return
for i in range(1, total // p):
f(total - p * i, price, ix + 1, args + [i])

class AnsDialog(QDialog):
def __init__(self, t, p):
super().__init__()
self.t = t
self.p = p
self.setWindowTitle("结果")

self.layout = QVBoxLayout()
for i in range(len(f_ret)):
ret = f_ret[i]
s = ""
for j in range(len(ret)):
s = s + str(ret[j]) + " * " + str(self.p[j]) + " + "
s = s[:-3] + ' = '
print(f"{s}{self.t}") # 输出到控制台窗口
message = QLabel(f"{s}{self.t}")
self.layout.addWidget(message)
self.setLayout(self.layout)


class Example(QWidget):

def __init__(self):
super().__init__()

self.initUI()

def initUI(self):
self.total_label = QLabel(self)
self.total_label.setText("总价")
self.total_label.move(20, 20)
self.total_price = QLineEdit(self)
self.total_price.move(50, 40)

self.unit_label = QLabel(self)
self.unit_label.setText("单价")
self.unit_label.move(20, 80)
self.unit_price_list = []
unit_price = QLineEdit(self)
unit_price.move(50, 110)
self.unit_price_list.append(unit_price)

self.add_btn = QPushButton('+', self)
self.add_btn.move(50, 80)
self.add_btn.clicked.connect(self.add_unit_price)

self.sub_btn = QPushButton('-', self)
self.sub_btn.move(120, 80)
self.sub_btn.clicked.connect(self.sub_unit_price)

self.calc_btn = QPushButton('计算', self)
self.calc_btn.move(200, 80)
self.calc_btn.clicked.connect(self.calc_price)

self.setGeometry(300, 300, 450, 350)
self.setWindowTitle('王工专用')
self.show()


def add_unit_price(self):
unit = self.unit_price_list[-1]
x, y = unit.x(), unit.y()

unit = QLineEdit(self)
unit.move(x, y + 25)
unit.show()
self.unit_price_list.append(unit)

def sub_unit_price(self):
if len(self.unit_price_list) > 1:
unit = self.unit_price_list.pop()
unit.close()
def calc_price(self):
total = int(self.total_price.text())
price = [i.text() for i in self.unit_price_list]
price = list(set(int(i) for i in price))
f_ret.clear()
f(total, price, 1)
dlg = AnsDialog(total, price)
dlg.exec()


def main():
app = QApplication(sys.argv)
ex = Example()
sys.exit(app.exec())


if __name__ == '__main__':
main()

简介

创建rbd-pool, 创建image

CREATE A BLOCK DEVICE POOL

1
$ rbd pool init <pool-name>

CREATE A BLOCK DEVICE USER

这部分我的理解还不够,暂时略过。直接参考官方文档会更好。

CREATING A BLOCK DEVICE IMAGE

1
$ rbd create --size {megabytes} {pool-name}/{image-name}

实例

1
rbd create nrbd.img --size 50G --pool rbd-pool

(我好像更喜欢各种风格的命令)

LISTING BLOCK DEVICE IMAGES

1
2
3
4
5
[root@ceph01 etc]# rbd ls --pool rbd-pool
bar
nnrbd.img
nrbd.img
rbd.img
1
2
3
4
5
6
7
8
9
10
11
12
13
14
[root@ceph01 etc]# rbd info nnrbd.img --pool rbd-pool
rbd image 'nnrbd.img':
size 50 GiB in 12800 objects
order 22 (4 MiB objects)
snapshot_count: 0
id: cb6eaf54bbe4
block_name_prefix: rbd_data.cb6eaf54bbe4
format: 2
features: layering, exclusive-lock
op_features:
flags:
create_timestamp: Mon Feb 27 11:09:59 2023
access_timestamp: Mon Feb 27 11:09:59 2023
modify_timestamp: Mon Feb 27 11:09:59 2023

客户端挂载

参考这篇博客可以知道

1
cephadmin@ceph-deploy:~/ceph-cluster$ sudo scp ceph.conf ceph.client.admin.keyring root@192.168.1.180:/etc/ceph/

是需要把这些配置文件复制到客户端。
ok,我按照这样的操作执行啦。可是接下来的命令不能work。然后我就尝试了好多方法,去定位问题。我去看官方文档,但是似乎并没有合适的解决方法。
直到今天早上灵机一动。我想到了server-client通信的问题。所以我就恍然大悟啦。
既然要通信,那必须有网络(软件抽象),有网卡(硬件抽象)。那么ceph的通信是需要两个网络的,一个public ip,一个private ip。所以需要在客户端添加一个private ip.

ip配置

参考链接
查看网卡配置文件

1
2
3
[root@localhost etc]# cd /etc/sysconfig/network-scripts/
[root@localhost network-scripts]# cat ifcfg-
ifcfg-ens18 ifcfg-eth0 ifcfg-lo

重启网络

1
systemctl restart network

检查ceph连接状况

1
2
3
4
5
6
7
8
9
10
11
12
13
14
15
16
17
18
19
[root@localhost etc]# ceph -s
cluster:
id: ba39b878-7aa9-45c3-b9d9-dab4a59bce4f
health: HEALTH_OK

services:
mon: 1 daemons, quorum mon1 (age 3d)
mgr: mon1(active, since 3d)
osd: 6 osds: 6 up (since 3d), 6 in (since 3d)
rgw: 1 daemon active (1 hosts, 1 zones)

data:
pools: 10 pools, 241 pgs
objects: 1.51k objects, 4.7 GiB
usage: 605 GiB used, 4.1 TiB / 4.7 TiB avail
pgs: 241 active+clean

io:
client: 27 KiB/s rd, 31 op/s rd, 0 op/s wr

新的问题

下一步我打算下载fio。但是遇到了新的错误。

1
2
3
$ yum install fio
ndctl-libs-65-5.el7.x86_64.rpm FAILED
https://mirrors.tuna.tsinghua.edu.cn/centos/7/os/x86_64/Packages/ndctl-libs-65-5.el7.x86_64.rpm: [Errno 14] curl#6 - "Could not resolve host: mirrors.tuna.tsinghua.edu.cn; Unknown error"

这错误上周也有遇到过。当时尝试了很多的错误方法,首先我认为是镜像源的问题,于是尝试更换了阿里镜像源,网易镜像源。但是都不行。因为看到是curl报的错,我还认为是curl的问题。
但是今天这个场景我就想到了是DNS的问题,因为我新添加的网卡没有配置DNS地址。

尝试ping百度也不行

1
2
[root@localhost etc]# ping www.baidu.com
ping: www.baidu.com: Name or service not known

修复方法
参考 stackexchange,stackoverflow

1
2
3
4
5
6
7
8
9
10
[root@localhost etc]# cat resolv.conf
# Generated by NetworkManager
search domain.name
nameserver 8.8.8.8
nameserver 1.1.1.1
nameserver 1.0.0.1
[root@localhost etc]# systemctl restart NetworkManager
[root@localhost etc]# ping www.baidu.com
PING www.a.shifen.com (180.101.50.242) 56(84) bytes of data.
64 bytes from 180.101.50.242 (180.101.50.242): icmp_seq=1 ttl=53 time=2.46 ms

(其实我最初的想法是添加路由,但是好像不太行)

当你对一个东西很熟悉的时候,解决问题的灵感自然就来了。